Happy Valentine’s Day with Red Donuts

donuts

Hi everyone,

I would like to wish you all a very Happy Valentine’s Day. Today is a day to remember those you love and to show them your appreciation; what better way to do that than by making them something sweet to eat!

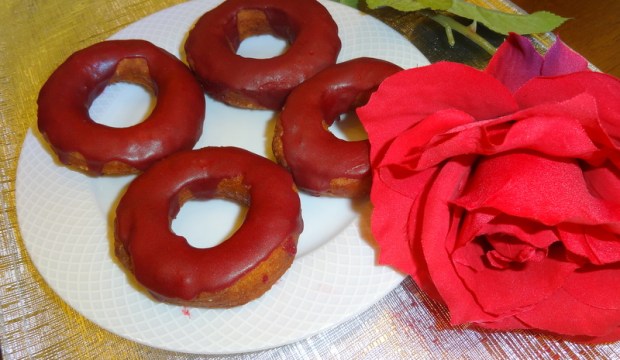
My youngest son just finished his undergraduate studies a couple of weeks ago, and today he went to collect some papers from university. I wanted to surprise him with something he’d enjoy, and since its Valentine’s day and everything is red, I made some donuts and added some red food coloring to the glazing to mark the occasion though I don’t really think that donuts are romantic. I think I might have put a few drops more of food coloring than I should have because the glaze looks blood red 😛 The important thing is that it put a smile on his face.

So today remember to show your loved ones a little affection. If they’re fans of donuts, make them some of these: smiles guaranteed!

Ingredients:

  • 1 cup warm milk
  • 1/4 cup sugar
  • 1/2 teaspoon salt
  • 1/4 cup vegetable oil
  • 1 egg
  • 3 cups flour
  • 1 tablespoon dried instant yeast
  • oil for frying

Preparation:

  • In a bowl, sift the flour with instant yeast
  • In another bowl, whisk the milk, egg, sugar, salt and oil then add the mixture to the flour, mix together until you have a soft dough
  • Cover the bowl in a cling film and leave the dough to rise and double in volume, for about one hour
  • Cover the surface you are working on with flour and roll the dough with a rolling pin to about 2 cm thickness then cut into a donut shape; leave it to rest for 15 minutes
  • Heat the frying oil (enough for deep frying) and fry the donuts from both sides for about 3 minutes on each side, until they turn golden color. Place on a kitchen paper to absorb the excess oil and allow to cool before glazing them with your choice of chocolate or red glaze

donuts1

For the chocolate glaze:

  • Boil one cup of cream with 2 tablespoons sugar and 2 tablespoons corn syrup then pour over one cup of sweet chocolate chip and stir until the chocolate melts, then add one teaspoon of vanilla

For colored glaze:

  • Mix one cup of icing sugar with one tablespoon of water or milk and add few drops of food coloring

ET VOILA… C’EST TOUT! BON APPETIT!

Omelette With Zucchini

omelette with zucchini

Whenever I make stuffed zucchini, I keep the cored insides to cook them as I did in this post, or to prepare an omelette like were going to do today. The zucchini gives the omelette a very nice flavor that my family just loves.

Ingredients:

  • about 2 cups of zucchini insides
  • 1 small onion, finely chopped
  • 4 eggs
  • 4 tablespoon flour
  • 1 teaspoon salt
  • a dash of ground cinnamon
  • 1/2 cup chopped parsley
  • frying oil

Preparation:

  • Mix the eggs with all the ingredients
  • Place the batter in the fridge for about one hour to settle
  • Now to cook them you have two choices:
    • Either you fry them in small batches
    • Or you place the batter in an oiled tray and bake in the preheated oven for about thirty minutes until the top becomes golden
  • Enjoy eating with a mixed vegetables salad

omelette with zucchini 1

ET VOILA.. C’EST TOUT! 🙂

Upside Down Pineapple Cake

This is a suitable cake for Spring. The pineapple used gives it a very refreshing taste, like a cool breeze! The pineapple juice also moistens the cake itself, giving it a more moist texture in the mouth. Nothing more to say about this cake, except that the decoration with strawberry adds a nice touch 🙂

Ingredients:

  • 5 eggs
  • 1 can of sliced pineapple (drained and juice kept)
  • 2 cups of sugar
  • 3 cups of flour + extra 1 tablespoon to dust the mold)
  • 1 cup pineapple juice
  • 1 teaspoon vanilla essence
  • 3 teaspoons baking powder
  • 1/2 cup butter at room temperature + extra tablespoon to grease the mold)
  • 1/4 cup of honey ( or golden syrup)

Preparation:

  • Preheat the oven to 180C
  • Grease a 26 cm diameter round and deep tray, dust with flour, pour the honey then place the pineapples slices over
  • With an electric mixer, mix the eggs with vanilla until pale then add sugar and keep mixing until the sugar dissolves
  • Alternate adding flour with pineapple juice, mixing slowly,then add the baking powder; keep mixing for a few minutes
  • Place the mixture in the tray and bake in the oven for about 40 to 45 minutes or until a skewer inserted comes out clean
  • Leave the cake in the tray for few minutes then turn it onto a wire rack to cool
  • Enjoy eating with fresh strawberry for decoration

ET VOILA .. C’EST TOUT 🙂

Croquettes of Cheese with Salsa Dip

The croquettes of cheese is one of my favorite appetizers. Every time we go out for dinner outside, first thing we check for on the menu is the cheese croquettes to have before the main meal. Believe me, I’ve tries a lot of recipes and the one I am sharing with you today is the more successful one. The good thing about this recipe is that it can be adjusted to your taste. You can use whatever kind of cheese you like and also you can add any kind of flavor like basil, rosemary, thyme, or anything else. Also, It can be baked in the oven or deep fry. Tell me if you like it 🙂

Ingredients:

  • 100 grams shredded cheese of your choice (I used Gruyere and Emmental)
  • 1 1/4 cup flour
  • 1/2 cup yogurt
  • 1 egg
  • pinch of salt
  • 1/2 teaspoon of baking powder
  • 1/4 cup melted butter

For the fried croquettes, the extra ingredients you will need:

  • one egg
  • one cup bread crumbs
  • about one liter frying oil

Mix all the ingredients and let it rest in the fridge for about half an hour. You can now prepare the croquettes by either frying them or baking them.

To fry them:

  • Make a small finger shape from the dough
  • Roll them in a slightly beaten egg, then in bread crumbs and deep fry for about 5 minutes untl they turn golden brown color

To bake them:

  • Preheat the oven for 180C
  • On a floured surface board roll the dough and cut into medium sized circles
  • Place them on a tray and bake for about half an hour until the croquettes turn golden color

These croquettes are delicious when accompanied with this salsa dip:

  • Chop one red tomato and one small onion very finely
  • Add one tablespoon of ketchup, a small teaspoon of salt, 1/2 teaspoon chili paste and a few leaves of chopped parsley

ET VOILA.. C’EST TOUT! 🙂

Fried Zucchini and Eggplant with Egg Free Shakshouka

Today I felt nostalgic for the good old days, when I was young and my grandmother used to make delicious food for me and my siblings. Maybe because it is Mother Day in many countries (we celebrate in Lebanon on the 21st of March with the beginning of spring). I remembered that I didn’t like the fried zucchini so grandmother dipped them in a batter before frying, which I found made it delicious.

Before posting, I did some research on Google to find  out about the meaning of Shakshouka, and I found that this is a very popular dish in a lot of Mediterranean countries. Many dishes of Lebanese Cuisine have a Turkish source. I assume that during the Ottoman occupation of these countries, some of their plates passed around. Most of these countries make the Shakshouka as a main dish with eggs on top, and that in Syria they call it Jaz Maz. But, in my family we have it as a side dish along with the fried zucchini, eggplants and other fried vegetables, sans egg. Whatever the source of this dish is, it will always be associated with nice memories from my childhood.

Ingredients for the Shakshouka:

  • 2 green peppers
  • 4 red tomatoes
  • 1 small onion, finely chopped
  • 3 cloves of garlic, crushed
  • 1 teaspoon salt
  • 1 tablespoon dried coriander
  • a pinch of chili pepper (if you like it more spicy, you can put more chili)
  • 1 tablespoon olive oil

Shakshouka

Preparation:

  • Heat the oil in a saucepan and fry the onion for 2 minutes
  • Dice the green pepper and fry with the onion for 3 extra minutes
  • Peel the tomatoes and dice them very small and add over the green pepper and the onion, reduce the fire and cover the casserole and let it simmer
  • In the meantime mix the garlic with salt, dried coriander and the chili and add it over the tomatoes and green pepper, mix well all the ingredients and let it cook for about 5 minutes
  • Serve it as a side dish with fried zucchini and eggplants

Ingredients of the batter:

  • 1 cup flour
  • 1 cup water
  • 1 egg
  • 1 teaspoon salt

Preparation of the batter:

  • Mix all the ingredients together
  • Cut all the vegetable you want to fry: zucchini, eggplant, dip in the batter and deep fry for about 5 minutes until golden
 
Fried zucchini
 

Fried eggplant

ET VOILA..C’EST TOUT.

Profiteroles And Eclairs

It is Saturday and the weekend has begun! I like to have some home made desserts for the weekend. Today I decided to make both Profiteroles and Eclairs since they are made from the same dough and filled with the same creme patissiere; the only difference between them is their shape.

Making this recipe requires two kinds of ingredients:  one for the dough and the other for the creme patissiere (filling).

Ingredients for the dough:

  • 100 grams of unsalted butter
  • 1 cup of water
  • a pinch of salt
  • 1 cup of all purpose flour
  • 4 eggs

Preparation of the dough:

  • In a small pot boil the water with butter and a pinch of salt
  • Add all the flour at once and mix vigorously until you have a consistent dough
  • Remove from fire and let it cool for 5 minutes, then add one egg at a time, mixing well in an electric mixer until well blended in the dough (you can use a wooden spoon to mix the eggs if you like, but it will take more effort)
  • When you finish mixing all the eggs in the dough, leave it to cool
  • Preheat the oven to 180 C
  • Grease a tray with a bit of butter, place the dough in a piping bag and using a large nozzle make circle shape to make the profiteroles, and long ones to make the eclairs
  • Bake for about 25 minutes, or until the top of the dough becomes light golden color

Ingredients for the creme patissiere:

  • 1/2 cup powder milk
  • 1 1/2 cup water
  • 1 egg
  • 3/4 cup sugar
  • 1/4 cup flour
  • 1 teaspoon vanilla

Preparation of the creme:

  • Boil the milk in a casserole and add the vanilla
  • In a bowl mix the sugar with flour and egg
  • Pour the mixture of egg, sugar and the flour slowly to the milk whisking constantly until thickening, then allow to cool. It is better to cover the creme with a cling film to prevent forming hard layer on the top when cooling

Filling the dough with creme:

  • Make a small hole in the profiterole ( the round shape) using a wooden stick
  • Place the cream in a piping bag and using a fine nozzle fill the dough.
  • For the eclairs (the long shaped ones) make a small cut on the side of the dough and with a small spoon spread the cream into it
  • For the final touch you can either sprinkle the sweets with icing sugar or make chocolate icing.

Chocolate icing:

  • Boil 3/4 cup of fresh milk with 1 teaspoon icing sugar and 1/2 teaspoon butter
  • Cut 50 grams of dark chocolate into small pieces and place it in a bowl
  • Pour the boiling cream over the chocolate and mix well until the chocolate dissolves

With a small teaspoon put the icing chocolate on the top of eclair and place on a grill to cool completely.

N.B : If you want to fill it with chocolate cream instead, replace 1 tablespoon of flour with 1 tablespoon of cocoa in the ingredients.

ET VOILA..C’EST TOUT! HAVE  A NICE WEEK-END 🙂

My 100th Post…….. Chocolate Cake With Snow White Frosting

I cannot believe that today I am doing my hundredth post and I am very excited. When I first started nearly three months ago, I never thought that I would be doing this steadily and would reach my 100th post. But, I should thank my children and my family for their encouragement and their faith in me, and also all of you fellow bloggers for your support, comments and your sweet words, you all provided me with the motivation I needed to persevere. Every recipe I posted was  a new challenge that made me want to improve and to become a better blogger, or at least try.

And for the occasion of the 100th post today I thought I should celebrate it in a very special way. This is why I made this lovely chocolate cake. I hope you will like it… 🙂

Ingredients:For the cake

  • 150 grams icing sugar ( 1 cup and 1/3 cup)
  • 50 grams flour (1/3 cup plus 1 tablespoon)
  • 50 grams  corn flour (1/3 cup plus 2 tablespoons)
  • 150 grams butter, melted – plus 1 tablespoon to grease the cake tin
  • 6 eggs, separated plus 1 whole egg
  • 40 grams coconut shredded ( 1/2 cup)
  • 2 tablespoons cocoa
  • 2 teaspoons baking powder, a pinch of salt

Preparation:

  • In a bowl mix the egg yolks with sugar, add the shredded coconut,  cocoa, whole egg, flour, baking powder, salt and corn flour and beat well
  • Preheat the oven to 180C
  • In a separate bowl beat the egg whites until firm, then fold into the previous mixture, then add the melted butter
  • Pour the cake mixture into the greased round cake tin, and bake in the middle rack of the oven for about 40-45 minutes, or until a skewer come out dry
  • Remove from the cake tin and let it cool completely on a wire rack, then slice it in half, it is now ready to be assembled

Ingredients for the decoration:

  • 200 grams of strawberry jam
  • 300 ml fresh cream
  • 2 tablespoons icing sugar
  • 100 grams cooking chocolate
  • 50 grams soft butter, 2 tablespoons icing sugar, 1 tablespoon cocoa plus 1 teaspoon vanilla extract
  • some fresh strawberry for decoration on the top

Decoration of the cake:

  • Put the jam on the bottom layer of the cake and cover it with the other half
  • Mix the fresh cream with the 2 tablespoons of icing sugar until thickens, then spread it on the top of the cake
  • Mix the butter with the 2 tablespoons of sugar, vanilla extract and the cocoa until smooth. Pipe it along the edge of the cake
  • Grate the cooking chocolate and spread over, finally put some strawberries for decoration

ET VOILA …C’EST TOUT… BON APPETIT:)

Tuna and Egg Sandwich

This is a sandwich that you can prepare and enjoy eating within 15 minutes. So, when I have friends over and we’re hungry I usually make this  sandwich, because the ingredients  are always available in the kitchen and there is no need to buy any groceries…

And, I usually make this sandwich when I feel lazy 🙂

To make 3 sandwiches you need:

Ingredients:

  • 9 slices of square bread (any kind you like)
  • 2 eggs
  • 2 tablespoons of mayonnaise
  • 1 can tuna
  • juice of 1 lemon
  • 1 medium tomato sliced
  • three leaves of lettuce
  • some potato chips ( any flavor you like)

Preparation:

  • Boil the eggs in salted water for about 11 minutes to become hard
  • In the meantime heat the slices of bread slightly in a toaster, but don’t let them get hard
  • Add the lemon juice to the tuna
  • Cover one layer of toast with mayonnaise, place the tuna over the mayo and put some lettuce
  • Place another slice of bread over the tuna, cover it with mayo and place a layer of sliced boiled eggs, and put over the eggs slices of tomatoes
  • Cover with another slice of bread, cut it diagonally, place in a plate  with the chips of your choice, and enjoy eating. Bon Appetit.

ET VOILA..C’EST TOUT.

Lazy Cake (Biscuit au Chocolat)

I love chocolate. I mean, I think I am addicted to chocolate. I always have some in the house. Every week, I have to make a chocolate cake, cupcake, biscuit with chocolate or anything else! My children also love it, especially my quadruple chocolate cake (maybe I’ll post it someday). Today I made this biscuit au chocolat, popularly known as Lazy Cake. Why did they call it lazy? Maybe because it doesn’t require any oven cooking, or maybe it can be made with simple ingredients. In any case, what counts is that it is DELICIOUS! 😀

Ingredients:

  • 2 eggs
  • 2 cup of icing sugar
  • 8 tablespoons of cocoa
  • 1 teaspoon vanilla essence
  • 200 grams butter
  • about 250 grams of biscuit ( you can use any kind you like, I used petit beurre biscuit)

Preparation:

  • Beat the eggs until pale yellow, then add the vanilla and sugar while mixing
  • Melt the butter in a small saucepan and add it to the egg mixture, then add the cocoa slowly
  • Snap the biscuits into pieces by hand over the mixture and fold with a spoon to cover all the pieces of biscuit with the chocolate
  • Line a cake tin with plastic cling film and pour the cake mixture in. Press the cake down with a spoon while pouring
  • Cover the tin with cling film and refrigerate for at least 5 hours until set
  • When the cake is hard enough, remove the cling film and take out from the cake tin , place in a serving plate and slice it and you’re ready to enjoy. As simple as that

ET VOILA..C’EST TOUT! 🙂

Coconut Balls

My sister in-law invited me to an afternoon gathering with her friends yesterday, and she asked me to make cheesecake to bring over with me. Knowing how much she enjoyed it the last time I made it, I obliged. I felt guilty leaving my son without a dessert for him to snack on so I decided to surprise him by preparing these coconut balls. I know how much he likes them, and I wanted to do something to cheer him up after a long day at university. It certainly did the trick 🙂

Ingredients:

  • 3 eggs
  • 5 cups shredded coconut
  • 1 cup  less 2 tablespoons semolina
  • 1 cup less 2 tablespoons granulated sugar
  • one lemon’s zest
  • 1/2 cup melted butter
  • 1 teaspoon vanilla extract
  • 1 teaspoon baking powder
  • pinch of salt
  • icing sugar to cover the coconut balls (optional)
Preparation:
  • Whisk the eggs with sugar, vanilla and the pinch of salt until the mixture becomes light and fluffy
  • Add the lemon zest, semolina, baking powder, coconut and the melted butter and mix well
  • Preheat the oven to 180c, prepare the baking sheets for the oven by lining them with wax paper, no need for butter
  • Roll the dough in palm-sized balls and roll in the icing sugar (you can choose not to roll in the sugar, either way is yummy)
  • Bake in the oven for 20 minutes until they turn light golden color
  • Leave in the trays until cool

ET VOILA..C’EST TOUT:)